Learning how to use Kling AI shouldn’t feel like decoding alien technology. We’ve all faced those moments staring at a new AI tool’s dashboard, completely lost in a sea of confusing buttons and options.
Here’s the good news: Kling AI 2.1 breaks the mold. This guide will show you exactly how to use Kling AI’s video generator to create pro-quality content – no computer science degree required.
What Is Kling AI 2.1?
Kling AI 2.1 is like having Spielberg in your laptop – an AI video generator that transforms text prompts or images into high-definition (720p to 1080p) videos with startling realism. Developed by Kuaishou, this isn’t your average AI tool that produces robotic, uncanny-valley footage.
What sets Kling 2.1 apart is its brain-like understanding of motion. Using 3D spatiotemporal attention (fancy talk for “it knows how things should move in space”) and diffusion transformer tech, it creates videos where people walk naturally, birds flap their wings correctly, and objects obey physics – mostly. The upgrade from version 2.0 is like going from a flip phone to a smartphone.
Key Features of Kling AI 2.1
Before we dive into how to use Kling AI, let’s explore what makes it special:
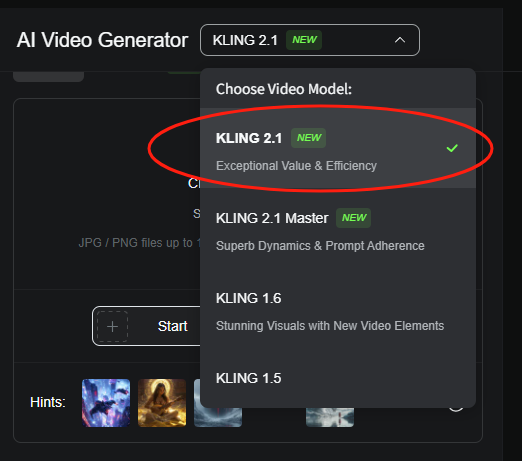
1. Three Quality Tiers for Every Need
Choose between Standard (720p for quick social posts), High-Quality (1080p for crisp visuals), or Master (cinematic 1080p) – all more affordable than your daily coffee habit.
2. Motion That Makes Sense
No more dogs running like wind-up toys. Kling 2.1’s physics engine ensures natural movement, whether it’s a dancing cat or falling leaves.
3. Prompt Understanding That Gets You
Unlike AI tools that ignore half your description, Kling 2.1 actually delivers what you ask for – “a grandma skateboarding through a neon Tokyo” gets you just that.
4. Multi-Element Magic (New!)
Upload multiple images (your dog + the Eiffel Tower + a UFO) and animate them together. Suddenly your poodle is Parisian and being abducted by aliens.
5. Director Mode for Beginners
Add cinematic camera moves with one click – dramatic zooms, sweeping pans – making your cat videos look like Oscar contenders.
How to Use Kling AI Video Generator: 8 Simple Steps
Step 1: Create Your Account
Visit Kling AI and sign up with email. Pro tip: Use a dedicated “AI tools” email to keep your projects organized.
Step 2: Find the AI Video Generator Function
Look for the “AI Video Generator” tab. The interface is refreshingly simple – no hidden menus or confusing icons.
Step 3: Pick Your Creation Method
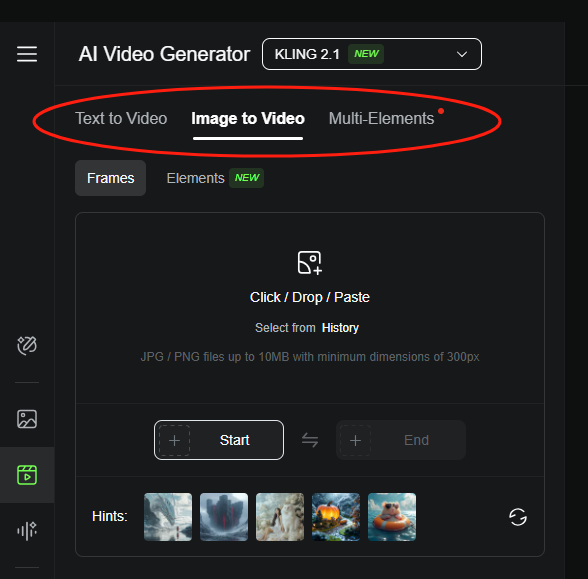
Kling AI gives you a few powerful ways to get started. You don’t have to stick to just one:
- Text-to-Video: Type a description, and Kling 2.1 will build a video from scratch. This is perfect when you have a great idea but no images to work with.
- Image-to-Video: Upload a single photo (like a snapshot of your cat) and then add a text prompt (e.g., “cat exploring a neon-lit alley”). The AI will animate your image within that scene.
- Multi-Elements (New!): This is for advanced projects. Upload multiple images (say, a friend, a tree, and a UFO) and use the tool to tell Kling 2.1 how to animate each one individually. Want your friend to wave while the UFO hovers? This is the tool for you.
Tips: Text-to-video is not available with Kling 2.1 currently.
Step 4: Craft Your Masterpiece Prompt
Based on your chosen model, here’s how to proceed:
Text-to-Video: Select this option, then type your prompt into the text box. Feel free to get detailed; you have up to 2,500 characters. For example: “A cyberpunk farmer harvesting glowing wheat under a purple moon, with a robot dog helping. The wind blows the wheat gently, and the robot’s eyes blink blue.” The more descriptive you are, the better the result.
Image-to-Video: First, upload your image. Make sure it’s high-quality, as a blurry photo will result in a blurry video. Then, add your text prompt. A good strategy is to reference elements from your image directly in the prompt, like: “the red-haired girl in the uploaded photo dances in a rainforest, with fireflies around her.” This helps the AI blend the image smoothly.
Multi-Elements: Upload each image one at a time. The tool will then allow you to “isolate” the main subject in each photo (like a person or a car). In your prompt, describe how each subject should move. For example: “The uploaded dog runs after the uploaded butterfly through a meadow, with the uploaded oak tree in the background.”
Step 5: Adjust Your Video Settings
Play with these sliders:
- Creativity (0-1): 0.7 is the sweet spot for balanced results
- Video Length: 5-30 seconds
- Aspect Ratio: 16:9 for YouTube, 9:16 for TikTok
- Camera Movement: Add pans or zooms for drama
- Lighting/Color: Choose “Golden Hour” or “Neon” for mood
Step 6: Use Negative Prompts to Refine Your Video
This step is optional but highly recommended. Think of negative prompts as your personal AI bouncer—you’re telling it what you don’t want in the final video.
Common issues to banish with negative prompts:
- “No distorted faces”
- “No extra fingers”
- “No blurry backgrounds”
Using negative prompts is like a safety net. Even the best AI tools have off days, and these prompts help you catch common mistakes before they ruin your video.
Read More: Midjourney Negative Prompt
Step 7: Generate Your Video
You’ve done all the hard work. Now, simply click the “Generate” button. Each video costs 10 credits, and remember, you get those 66 free daily credits. That’s about 6-7 free videos a day—plenty of chances to experiment.
Pro Tip: When you’re testing a new prompt, generate 2-3 versions. AI can be a bit unpredictable, and sometimes the second or third attempt is the one that’s pure magic.
Step 8: Download and Share
Preview your video. If Fido suddenly has three tails, tweak your prompt and try again. Satisfied? Download and impress your friends!
Conclusion on How to Use Kling AI
In the wild west of AI video tools, Kling 2.1 stands out by actually working as advertised.
It’s perfect for creators who want professional results without the headache. Whether you’re making viral TikToks or client presentations, mastering how to use Kling AI will give you an edge in today’s visual world.
Bookmark this guide – you’ll want to reference these steps as you experiment. Now go make something amazing!